When it comes to WordPress websites’ performance, Nginx and OpenLiteSpeed are the two web servers that come to mind. I have already published a tutorial on how to install WordPress with Nginx on Ubuntu. But this tutorial covers a complete guide to install and configure WordPress with Openslitespeed on Ubuntu with SSL.
Like Nginx, Openlitespeed is another performance-oriented web server that has already gained so much popularity by offering awesome performance. The best part about Openslitespeed is that it offers lots and lots of features like gzip and brotli compression, HTTP/3 support, security optimizations, Apache-compatible rewrite rules, and much more. So let’s get going
In this tutorial, you will learn
- Prerequisite
- Step 1 – Install OpenLiteSpeed on Ubuntu
- Step 2 – Install required lsphp modules
- Step 3 – Install and configure the MariaDB server
- Step 4 – Configure UFW firewall
- Step 5 – Download WordPress and set it up
- Step 6 – Configure Openlitespeed admin username and password
- Step 7 – Configure Openlitespeed
- Step 8 – Set up Let's Encrypt SSL in OpenLiteSpeed
- Step 9 – Configure SSL on Openlitespeed
- Conclusion
Prerequisite
- Ubuntu server with initial server setup done
- A Linux user with sudo privileges
Step 1 – Install OpenLiteSpeed on Ubuntu
The first step to configure Openlitespeed on Ubuntu is to update the repository, upgrade the packages, and then add the Openlitespeed repository to Ubuntu so that all the packages required by Openlitespeed will be available.
# sudo apt update
# sudo apt upgrade -y
With this, our system is updated. Now, let’s add the Openlitespeed repository
# sudo wget -O - https://repo.litespeed.sh | sudo bash
# sudo apt update
Now, let’s install OpenLiteSpeed
# sudo apt install openlitespeed lsphp84 -yStep 2 – Install required lsphp modules
For WordPress to work seamlessly, we will have to install some lsphp modules.
# sudo apt install lsphp84-common lsphp84-curl lsphp84-imap lsphp84-mysql lsphp84-opcache lsphp84-imagick lsphp84-memcached lsphp84-redis lsphp84-intl -yStep 3 – Install and configure the MariaDB server
The next step is to install and configure the MariaDB server, which will do all our database-related activities.
# sudo apt install mariadb-server -y
# sudo mysql_secure_installation
Here, you will be asked some questions like changing root password, removing anonymous users, and others. Follow the instructions as shown below
Enter current password for root (enter for none):
Set root password? [Y/n] Y
New password:
Re-enter new password:
Remove anonymous users? [Y/n] Y
Disallow root login remotely? [Y/n] Y
Remove test database and access to it? [Y/n] Y
Reload privilege tables now? [Y/n] Y
Now, let’s create a database and assignthe required privileges
# sudo mysql -u root -pCREATE DATABASE your_database_name CHARACTER SET utf8mb4 COLLATE utf8mb4_unicode_520_ci;
GRANT ALL ON your_database_name.* TO 'your_database_user'@'localhost' IDENTIFIED BY 'your_password';
FLUSH PRIVILEGES;
EXIT;Note: Make sure to change "your_database_name", "your_database_user" and "your_password" as per your wish. Also make sure to save these as we will need these later on.
Step 4 – Configure UFW firewall
Configure the firewall to allow us to access the admin page using a web-based interface.
# sudo ufw allow 7080/tcp
# sudo ufw allow 8088/tcp
# sudo ufw allow 80/tcp
# sudo ufw allow 443/tcp
Step 5 – Download WordPress and set it up
Let’s download the latest WordPress package and set it up
# cd /tmp
# sudo curl -O https://wordpress.org/latest.tar.gz
# sudo tar xzvf latest.tar.gz
As our latest.tar.gz is extracted in the WordPress folder, let’s change the name to your_domain
# sudo mv wordpress your_domainNote: Change your_domain to the name of your domain
# cd your_domain
# sudo cp wp-config-sample.php wp-config.php
# sudo nano wp-config.php
Update the parameters shown below according to step 3
...
define('DB_NAME', 'your_database_name');

/** MySQL database username */
define('DB_USER', 'your_database_user');

/** MySQL database password */
define('DB_PASSWORD', 'your_password');

/** Database charset to use in creating database tables. */
define( 'DB_CHARSET', 'utf8mb4' );


...

define('FS_METHOD', 'direct');
Save the file by pressing “ctrl+x“, “y“, and press the “Enter” key
Now, let’s copy the complete folder to the server root directory and assign the required privileges
# sudo cp -a /tmp/your_domain/. /usr/local/lsws/Example/html/your_domain
# sudo chown -R nobody:nogroup /usr/local/lsws/Example/html/your_domain
Step 6 – Configure Openlitespeed admin username and password
Since OpenLiteSpeed is commonly managed via a web-based interface, we will have to set a username and password for the same.
# sudo /usr/local/lsws/admin/misc/admpass.shEnter the username and password as per your wish. Remember that to control and manage the Openlitespeed server, you will need these, so make sure to save these credentials somewhere.
Let’s start the OpenLiteSpeed server
# sudo /usr/local/lsws/bin/lswsctrl startStep 7 – Configure Openlitespeed
Now that we have already configured everything on our server, we need to configure OpenLiteSpeed using the web interface. So, follow the steps given below
On any browser, open http://your_server_ip:7080
Enter your login ID and password that you have configured in step 6
Change the default port from 8088 to 80
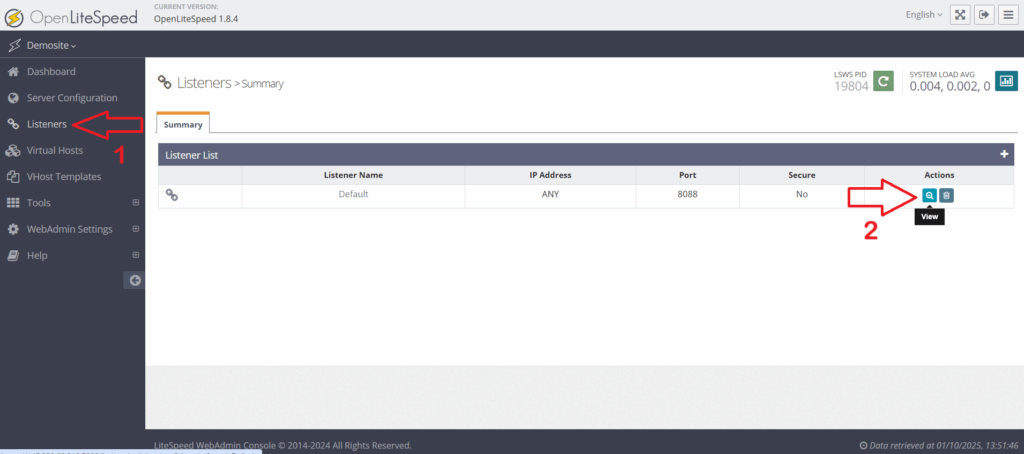
After login, click “Listeners“, then click “View“
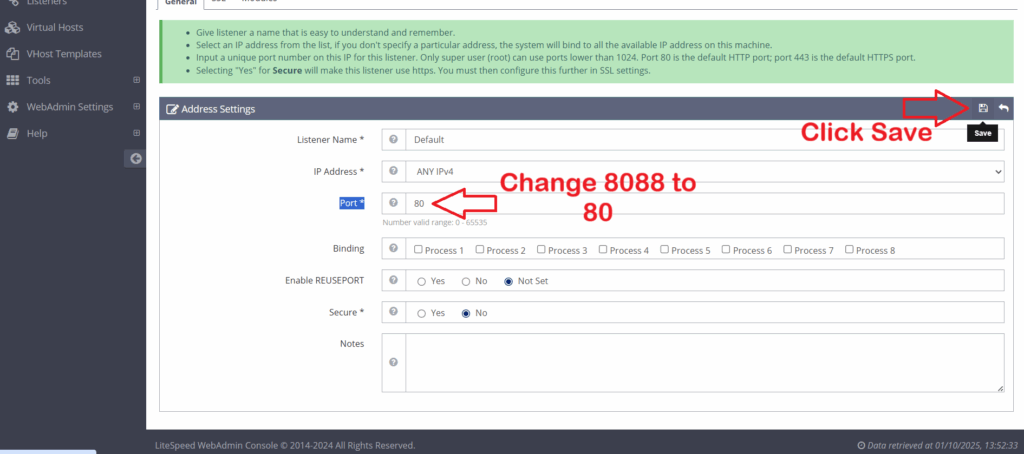
Click “Edit” in “Address Settings“.

Change “8088” to “80” in the “Port” field. Then click “Save“
Configure Domain in OpenLiteSpeed
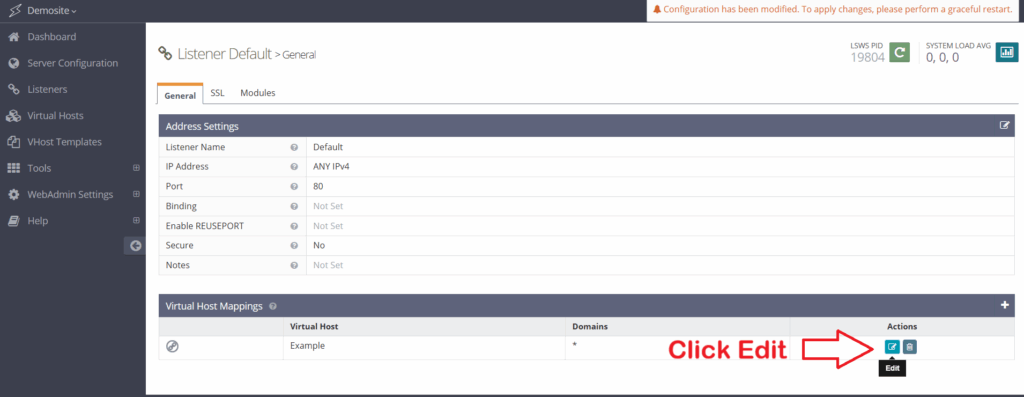
Scroll down to “Virtual Hosts Mapping” option, and click “Edit” under “Actions“.
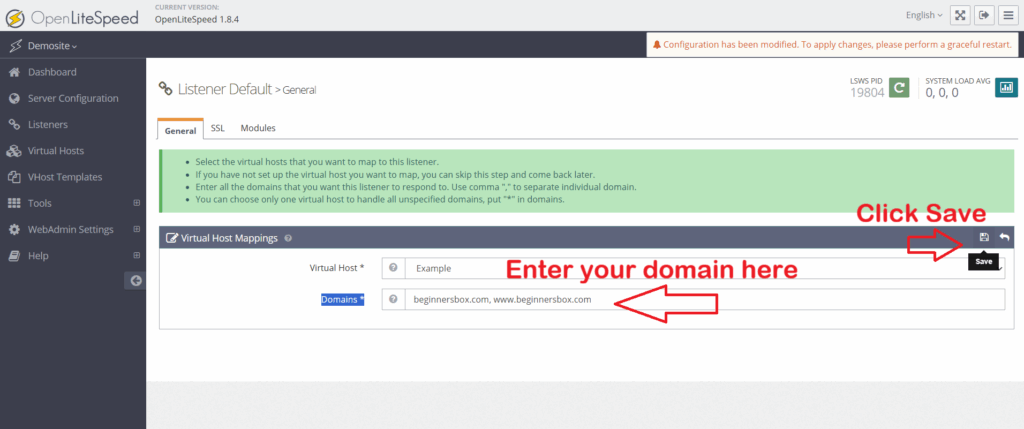
Enter your domain with and without “www” separated by “,“. Then click “Save“
Set up the right lsphp version
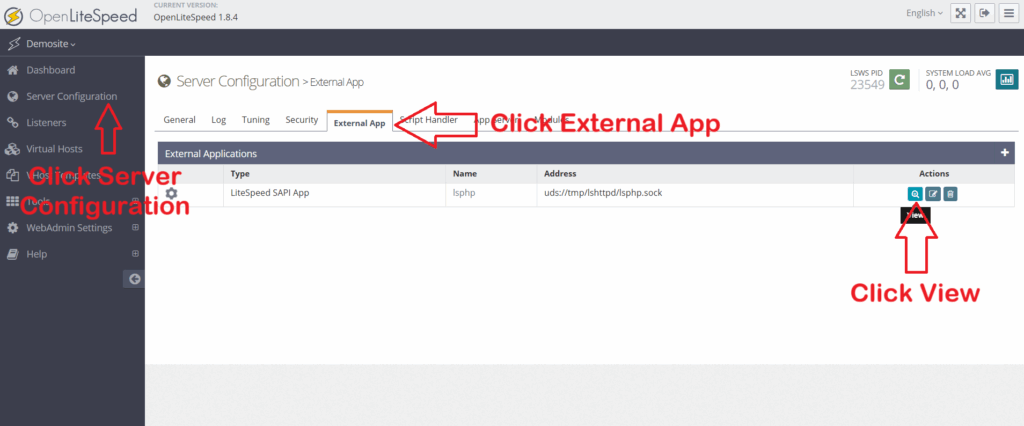
Click “Server Configuration” on the left, then click “External App“
Now, click on “view” under “Actions“.
Click on “Edit“
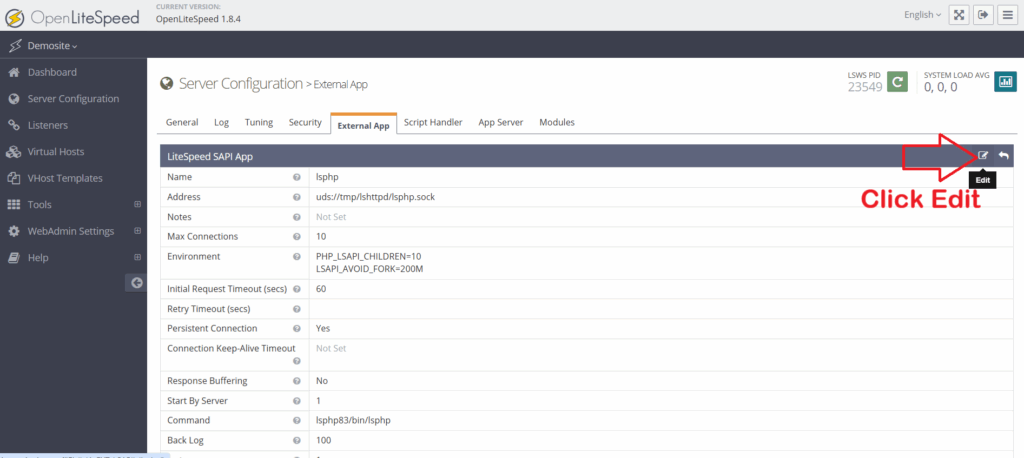
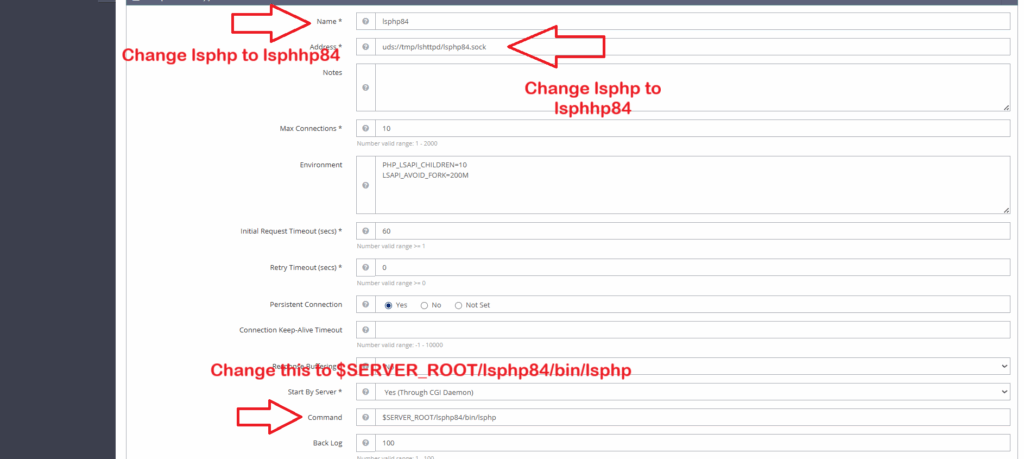
Make the following changes
Change “Name” field to lsphp84
Change “Address” field to uds://tmp/lshttpd/lsphp84.sock
Change “Command” field to $SERVER_ROOT/lsphp84/bin/lsphp
Click on “Save“
Next, click on the “Virtual Hosts” option, then click “View“

Click the “General” tab, then click “Edit“
Change “Document Root” to “$VH_ROOT/html/your_domain” and click “Save“

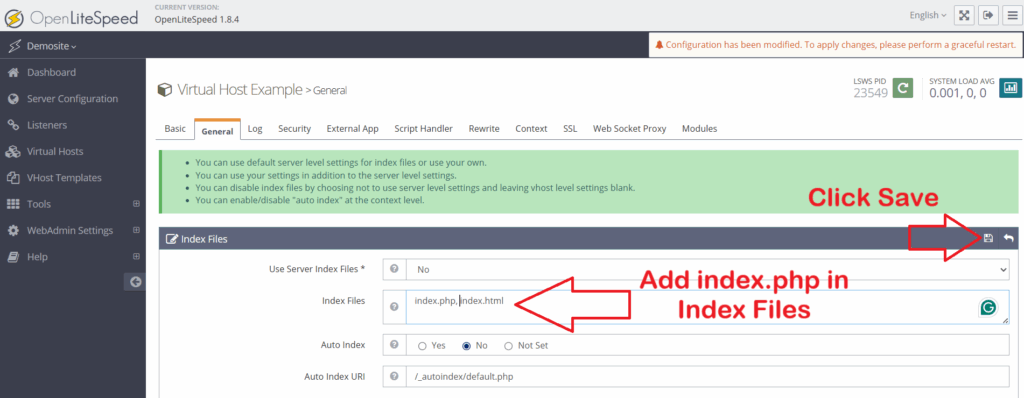
Next, scroll down to “Index Files” and click “Edit“
Change “Index Files” to “index.php, index.html“
Click “Save“.
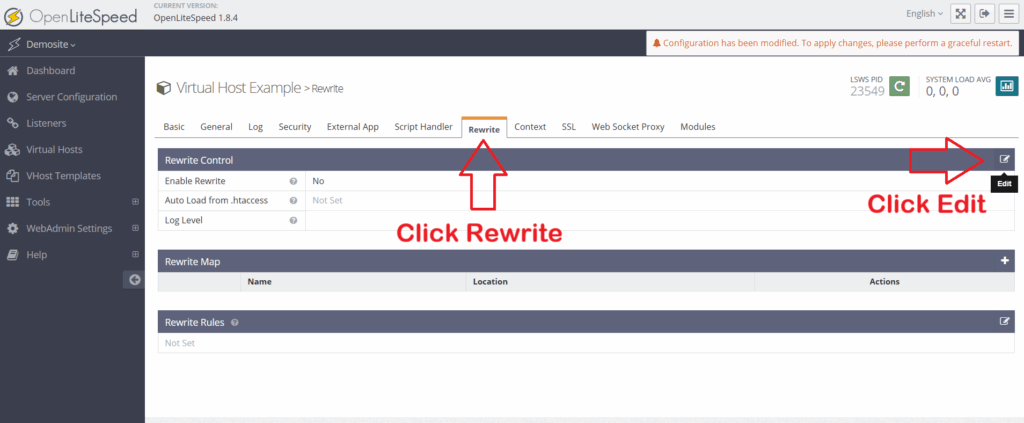
Click on the “Rewrite” tab, then click on “Edit” beside “Rewrite control“
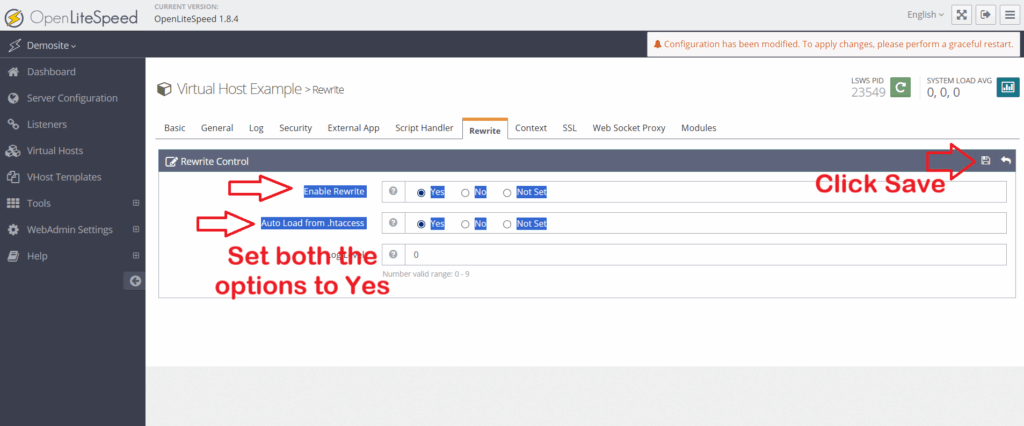
Change “Enable Rewrite” and “Auto Load from .htaccess” to “Yes“
Click “Save“
Click on the “Security” tab
Scroll down to “Realm List” and delete the entry named “SampleProtectedArea“

Next, click on “Context” and delete URI “/protected“
As everything is done, just do a graceful restart by clicking on the green icon at the top right corner. Also, make sure to restart the lsws service on the server by executing
# sudo systemctl restart lsws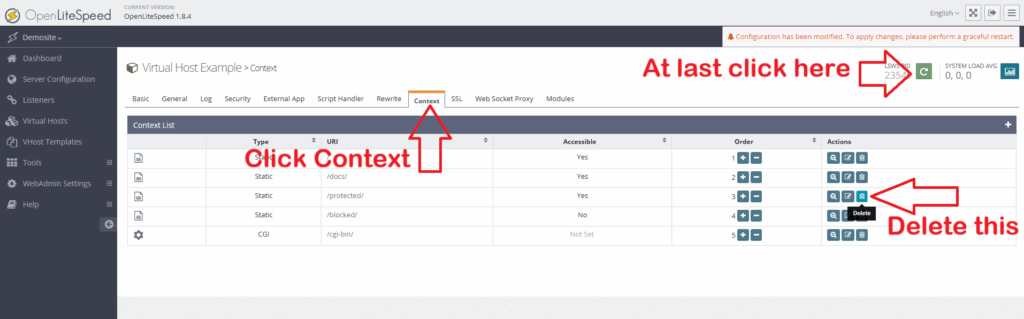
Step 8 – Set up Let’s Encrypt SSL in OpenLiteSpeed
To set up Let’s Encrypt, we will use certbot. So let’s first install it
# sudo apt install certbot -y
# sudo certbot certonly --webroot -w /usr/local/lsws/Example/html/your_domain -d your-domain.com -d www.your_domain.com
Note: Make sure to change your_domain to your real domain
Step 9 – Configure SSL on Openlitespeed
To configure SSL, we need to make some changes to our OpenLiteSpeed settings.
Log in to LiteSpeed web admin
Click on “Listeners“, then click “View” under “Actions“

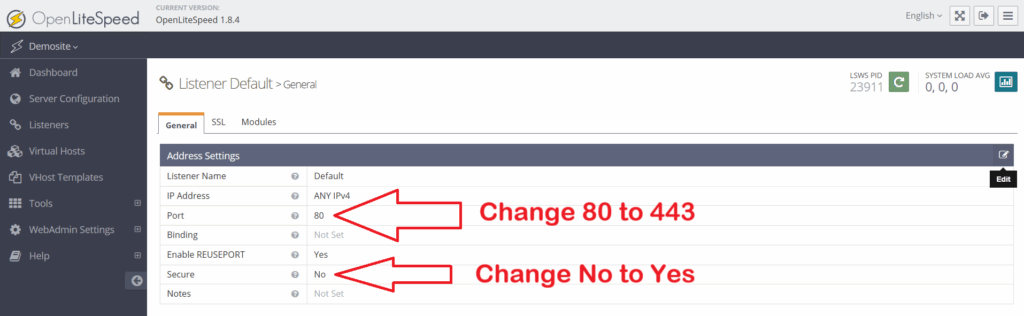
Click on “Edit” and change the port to “443”
Change both “Enable REUSEPORT” and “Secure” to “Yes“, then click “save“
Next, click on the “SSL” tab
Click “edit” and add the following
Private Key File – /etc/letsencrypt/live/your_domain.com/privkey.pem
Certificate File – /etc/letsencrypt/live/your_domain.com/fullchain.pem
Chained Certificate – Yes

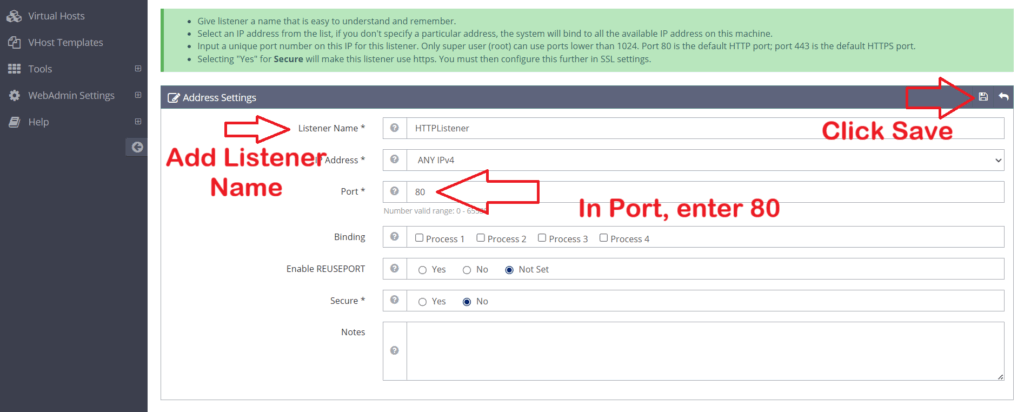
Click on “Listeners” and click on “+” icon infront of “Listener List“

Now, enter the following in the fields given below
Listener Name * – HTTP LISTENER
Port * – 80
Click “Save“.
Now just do a graceful restart and it’s done.
Conclusion
This was the complete guide to install and configure WordPress with OpenLiteSpeed on Ubuntu with SSL.
Leave a Reply